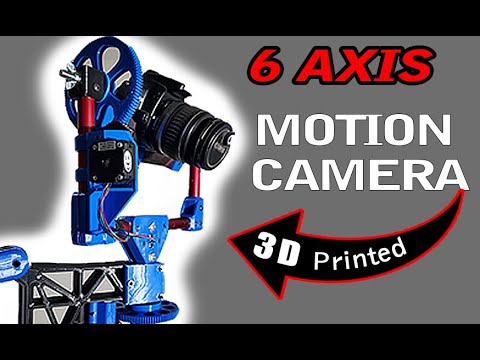
The greatest DIY MOTION CONTROL camera rig EVER – allegedly
Completely Free to download and build for yourself !! The files are listed on thingiverse and available NOW.
https://www.thingiverse.com/thing:4652484 – Doitwhenever
www.doitwhenever.com
If you wanted show your appreciation more then just a like and subscription, There’s always PayPal 🙂 Every little bit helps as the project and videos are not free for me to make. I hope you enjoy this really cool project and ridiculous supporting video 🙂
paypal.me/ytdoitwhenever
I have 2 more videos coming! One for the assembly, and one for the electronics and control software. I’ll include the basic info and bill of materials (BOM)….. but stay tuned for the other videos as I’ll go into more detail on both topics and a complete BOM list. This rig is easy to assemble, but it will take you a while to print.
It’s pretty amazing what you can do with an idea in today’s world
– DIW
I’ll provide all the links to the items I used in the future videos as well as my website, but don’t worry….by the time you download the files and drop them in your slicer, you’ll find you have about 2 weeks of printing ahead of you.
Here’s the basic BOM I used:
—-ELECTRONICS—-
* Raspberry pi 3 (or 4) – https://amzn.to/3SQPUkz
* Arduino mega 2560 –https://amzn.to/3f4oyEj
* 6 axis CNC shield – https://www.tindie.com/products/eccentricwkshp/grblduino-mega-shield-grbl-11-arduino-cnc-shield/
* Stepper drivers (TMC2208 for quiet motor operation) – https://amzn.to/3kEzU31
* DC-DC buck convertor 5V – https://amzn.to/35Bjmo1
* LED volt gauge (OPTIONAL) – https://amzn.to/3AfNgOa
* Misc. rocker switches (OPTIONAL) – https://amzn.to/338wakv
* Camera DC-DC convertor (OPTIONAL) – Camera specific
* Various connectors and CAT5e “stranded” wire
* Electrical slip rings (6 wire ) – https://amzn.to/3lD5jnz
* Electrical slip rings (12 wire ) – https://amzn.to/3dgYSr0
* Electrical slip rings (24 wire ) – https://amzn.to/3faAcxh
* NEMA 17 gearhead stepper motors QTY 2 – https://amzn.to/3bRXsTC
* NEMA 17 stepper motors QTY – 1 – https://amzn.to/2UKPdwm
* NEMA 8 gearhead stepper motors – https://www.omc-stepperonline.com/nem…
* 3 cell lipo batteries (5000mh) – (OPTIONAL, any brand will work) – https://amzn.to/3Qon7lN
—-HARDWARE—-
* 1″ OD anodized aluminum tubing.
* 3/4″ OD anodized aluminum tubing
* 3″ x 3″ solid metal round blank (built-in counter-weight) Don’t worry if you can’t find this item. I’ve designed a 3d printed container that replaces that item. You can fill it with commonly sourced lead (think scuba weight bags)
* Various length bolts, washers, and nuts (2mm – 3mm – 5mm – 8mm)
* Slot channel style t-nuts (their slim and lightweight) – https://amzn.to/3w0E3H8
* 16 Teeth 8mm Bore Motor Metal Gear QTY 2 – https://amzn.to/3CjIWiv
* Speaker Tripod Stand – https://amzn.to/3bPATPx
—-Control Solutions—-
UGS ( universal gcode sender platform) This runs on the raspberry pi – https://winder.github.io/ugs_website/
GRBL mega 5X fork – this runs on the Arduino – https://github.com/fra589/grbl-Mega-5X
—-Gcode Info—
Here’s the simple way to control this machine:
You have to specify the coordinate system G90 & G91 (Absolute vs Incremental)
One system (G90) will take your move commands based on an exact “machine” position. This is useful when you want to repeat the same moves over and over. (G91) The other system will take move commands as incremental, if you tell the machine to move 100mm… it will, but it wont have an “easy” home position. You can achieve the same results by using G91 (incremental) but it’s a bit more legwork to keep track of where the machine thinks it’s at in 3d space. I use the incremental method when I’m doing one off camera shots, or quick setups. G91 It faster but less forgiving for repeatability.
The next move I use is G1 (linear move)
This command tells the machine to move a specific axis to a specific location using linear motion (straight line). You’re able to move multiple axis at the same time, and they complete their moves simultaneously.
G2 and G3 are for arcing moves (non-linear) ….and look like fun to play around with, but I actually haven’t. If your an advanced user I’m sure you can code some cool ramping shots comparable to Drangonframe’s interface.
Hit me up if that’s your wheelhouse 🙂 I’m just a deck-hand when it comes to the software side of my projects.
I’ve calibrated the controller (Arduino) so the rotation axis have 360 degrees (0 – 360mm in 3d CNC space). The non rotational axis (arm, focus, and zoom controls) are calibrated for 100 degrees of movement (0 -100mm in 3d CNC space)
Be sure to check out the other videos dedicated to the electronics and how to control them!
As an Amazon Associate I earn from qualifying purchases. #Sponsored


